Wednesday, 30 April 2014

4 Simple Summer Up-Dos with Label.M’s Texturising Volume Spray


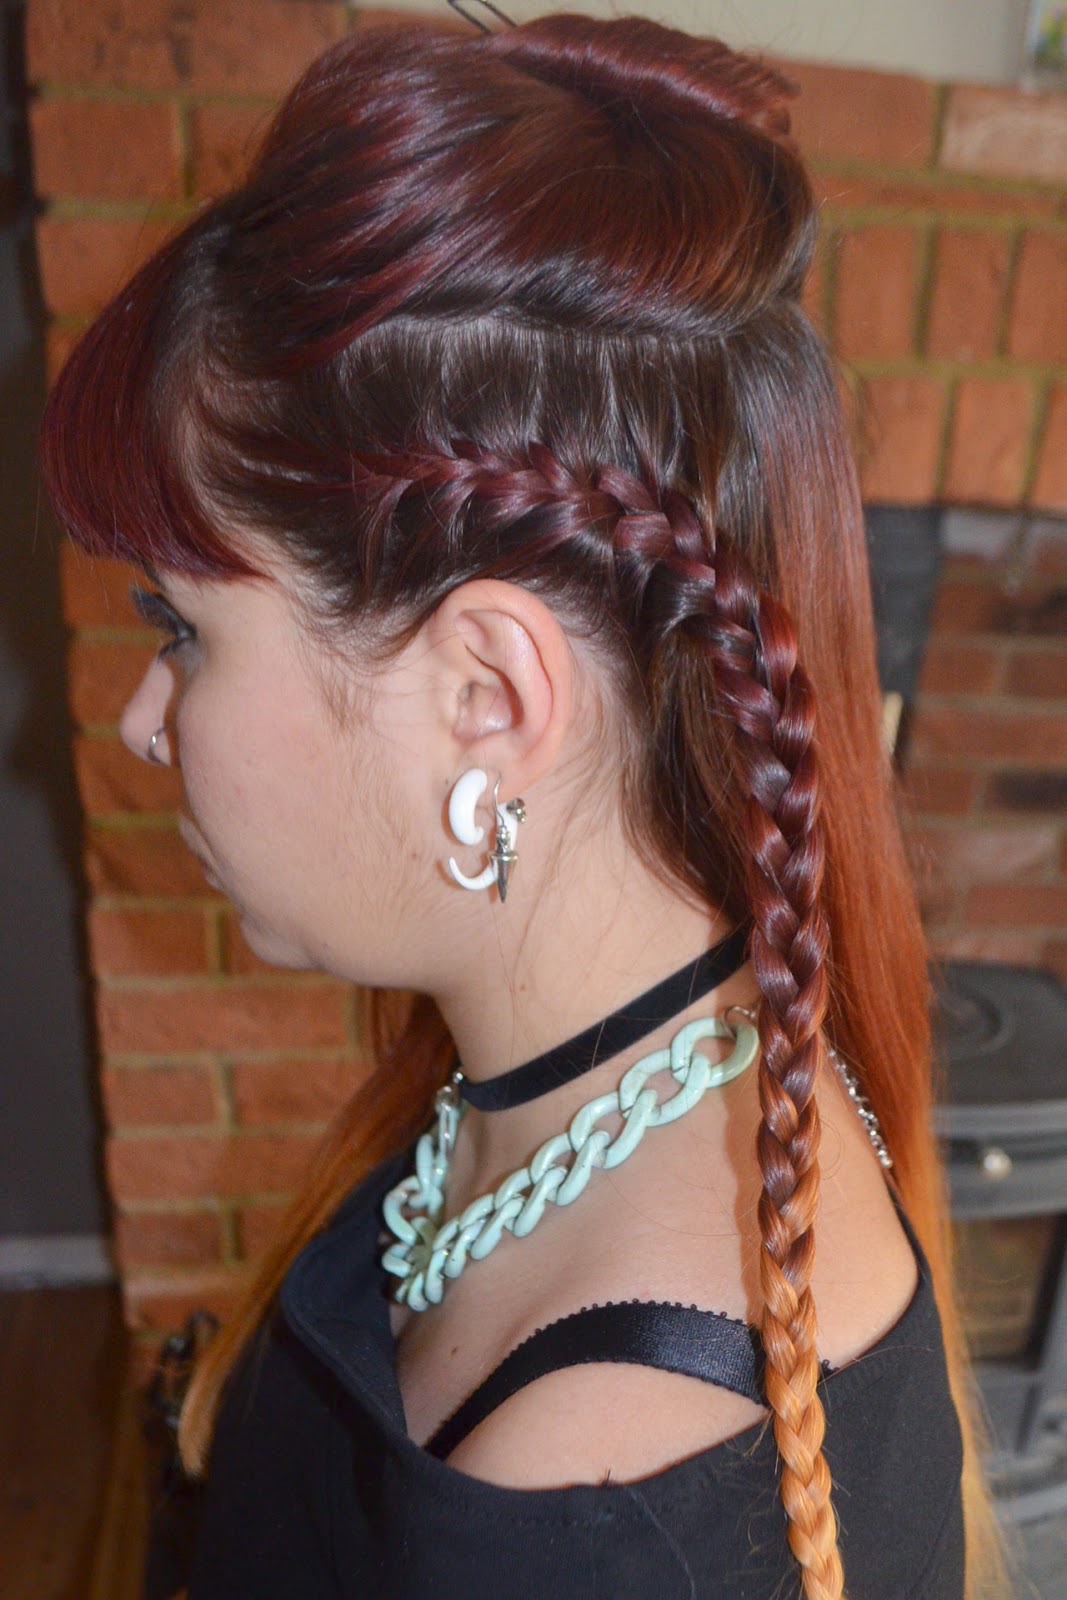
Now that I’ve got this fiery ombre look, Nat and I decided to have a little play around with some up-dos (in my living room, so excuse the mess, we're not tidy workers). Also, the lovely people at Label.M sent me their Texturising Volume Spray to try out, so all of these styles show the best way to use this product when doing hair ups.
                              

Look 1


1)Take the top section of hair, starting two inches above the ear and clip it up.

       2) French plait the remaining hair above the ears on both side until you’ve reached just behind the ear, then    continue plaiting the lengths. Secure at the ends with a pin.

      3) Unclip the top section, add Label M spray, remembering to hold the spray about 20cm away from the hair, and then backcomb. Bring together, push forward for height, twist and pin securely.
                                                     
4)Take the remaining hair at the back, twist up into a rough chignon and pin.


    5)Bring the remaining hair around into a rough bun, and pin.
    6) Take the plaits and wrap the loose ends around the bun


.


Look 2

        1)Follow steps 1,2 and 3 from above, but put the remaining hair into a secure ponytail.
       2)Wrap the plaits around, in opposite directions around the ponytail.


        3)Add some Label.M Texturising Volume Spray  to the ponytail for a messy texture.

Look 3

       1) Brush hair to one side
       2)Spray Label.M Texturisng Volume Spray to top part of the hair. Ruffle with fingers for a messy texture.
        3)Spray the rest of the hair with Label.M Texturising Volume Spray if you’re hair is really smooth or difficult to manipulate.  
        4)Divide hair into two sections.
        5)Take a small piece from the outside of the left section, and pass over the front  to the right section. Take a small piece from the outside of the right section, and pass over the front to the left section.
       6)  Leave out every third strand for a tassel look.


Look 4

       1)  Repeat all of the above steps except the last.
       2)Instead of leaving pieces out, incorporate all of the hair into a fishtail plat, and pull out the strands once tied to loosen it and spray well with Label.M Texturising Volume Spray. 

   Me and Nat really enjoyed working with the Label.M Texturising Volume Spray. I have really thick, sleek hair that'll slip out of any style I put it in. The spray added enough texture to make it workable and enabled us to manipulate it in a variety of ways. However be really vigilant as to how close to the hair you hold the spray. Just like dry shampoo, if you hold it too close, you will end up with grey patches. On that note, is does actually work quite well as a dry shampoo or a hairspray, and can add a bit of edge to normal straight hair. 
    I hope you find these tutorials useful, and if you're from the Bedfordshire area and want more information on Nat's work, visit elegancebytlc.co.uk

Steph and Nat 
x x x


READ MORE

Thursday, 10 April 2014

New Hair - Dip Dye How-To

So I mentioned in my last post that I'd had a complete hair makeover, which was my reason for buying the Remington Pearl Pro Curl. If you've read my About Me page, you'll also remember my mentioning of my lovely friend and hairdressing genius Natalie. Now we met back in 2008, working at a local hair salon together. To this day, she is one of my closest friends, and one of the most talented hairdressers I've ever met. She has been doing my hair for years now, and I don't think I'd trust any one else with it.

So when I decided I wanted a bit of a change, I thought it would be a perfect opportunity to introduce you to her, and show you an example of some of the posts we'll be doing together in the future. So without further ado, here is Nat:


 and here is my snazzy new do, literally minutes after it was done.:


Ta-da!!!!

I've been a redhead for almost four years now and with all these amazing pastel shades popping up, I was envious of the new lease of life everyone's hair seemed to be getting. Now I've never bleached my hair all over before, and as much as I want a pastel shade, I'm not ready to commit to bleaching my hair all over, simply because of how much colour i'd have to strip off, and I'll admit it now, I'm not very good at regular trims and overall hair maintenance, so I wasn't sure my hair could take it.

Instead, I opted for a firey dip-dye, to test the bleachy water, and I couldn't be happier. I almost squealed the other day when someone told me it looked like my hair was on fire. Now there's no way I would have attempted this by myself, but I am a massive scaredy cat when it comes to my hair. I'm extremely over-protective of it. But if you do decide to do something like this yourself, I've provided below a step-by-step how-to of everything Natalie did to get this look, as well as some tips and advice.

What you'll need
Sectioning clips | Mixing Bowl | Tinting Brush | An old towel/hairdressing cloak | Peroxide  and Bleach Powder (see image below for reference | Tin Foil | Gloves


Method
1) In a tint bowl, mix peroxide (We used volume 40 to get through all the layers of red dye) and bleach powder half and half, until both components are combined.
2) Section hair into 4 pieces: two at the front, two at the back like so.

 3)Wearing gloves and using the tint brush, apply bleach to one of the front sections, applying a very thick amount to the ends. Using your hands, WITH GLOVES ON, massage the bleach into the ends to make sure it covers all the hairs, and then spread the bleach upwards to the mid-lengths, or the point where you want the dip-dye to start. There should be a lot more bleach on the ends than towards the top. The decrease in bleach the higher you go ensures the gradient effect. Repeat this on the other three sections.  Leave for 45 minutes.
4)For faster results, wrap  the bleached sections  in tin foil. 
5)Rinse off with shampoo and dry.
6)Reapply a fresh mixture of bleach (same measurements) to the very ends to slightly lighten them, about an inch or so up. Leave for about 15 minutes and again wrap in tin foil.
7)Rinse, condition and style.
   - For any sort of dip-dye, I feel the best way to showcase the gradient is to curl the hair, like the pictures         below,  hence why I purchased the Remington Pearl Pro Curl


As I mentioned in my March Haul post, I did a lot of research before buying this product, because I've never used one before, and I don't want to do any damage to my hair. So for my first try, just to be safe, Nat showed me the best way to use them, as well as some extra advice and tips on how to make the curls last, which we're going to share with you too. 

Curls

1) Section into four pieces, like you did for the dip-dye : two at the front, two at the back
2) On a section of your choice, take a thin slice of hair from the very bottom. Clip the rest of the section              away.
3) There are two ways to curl your hair, depending on what style curl you want. Putting the wand on top of the hair with hair going under it creates a curl with more of flick out, however this doesn't create volume.
Putting the wand under the hair with the hair going over it creates volume and lift, especially at the top of the head.  Pick one of these techniques, and use it on the first thin slice of hair. Repeat this all the way to the top of your first section. Then repeat for the remaining three sections.
TOP TIP: If like me you have thick hair, which is prone to dropping, spray each slice of hair with hair spray before you curl it, and spray it once more just after. (I recommend Tresemme Salon Finish Extra Hold )
Also, thick hair is quite heavy, which makes it quite hard to create volume. For a helping hand, use a texturing or volume spray. We used Label M's Texturising Volume Spray.
4) Give all your hair a quick once over with the hair spray again if you find your curls are dropping.  Tip your hair upside down and give a light spray with the texturising spray if needed.
5) Can neaten curls with a flat bristle brush. This type won't brush out the curls.

So here is the finished look : D Just for reference, as a base I use Loreal Feria Pure Scarlet Power.
It's taking me a while to get used to the full fringe, but I'm so in love with the dip-dye. I can't thank Natalie enough.


If there's anyone out there from the Bedfordshire area who's interested in contacting Natalie about having your hair done, or some of her work, contact Elegance Salon by TLC, Brickhill, Bedford, or check out their website at www.elegancebytlc.co.uk


READ MORE