Wednesday, 30 April 2014

4 Simple Summer Up-Dos with Label.M’s Texturising Volume Spray


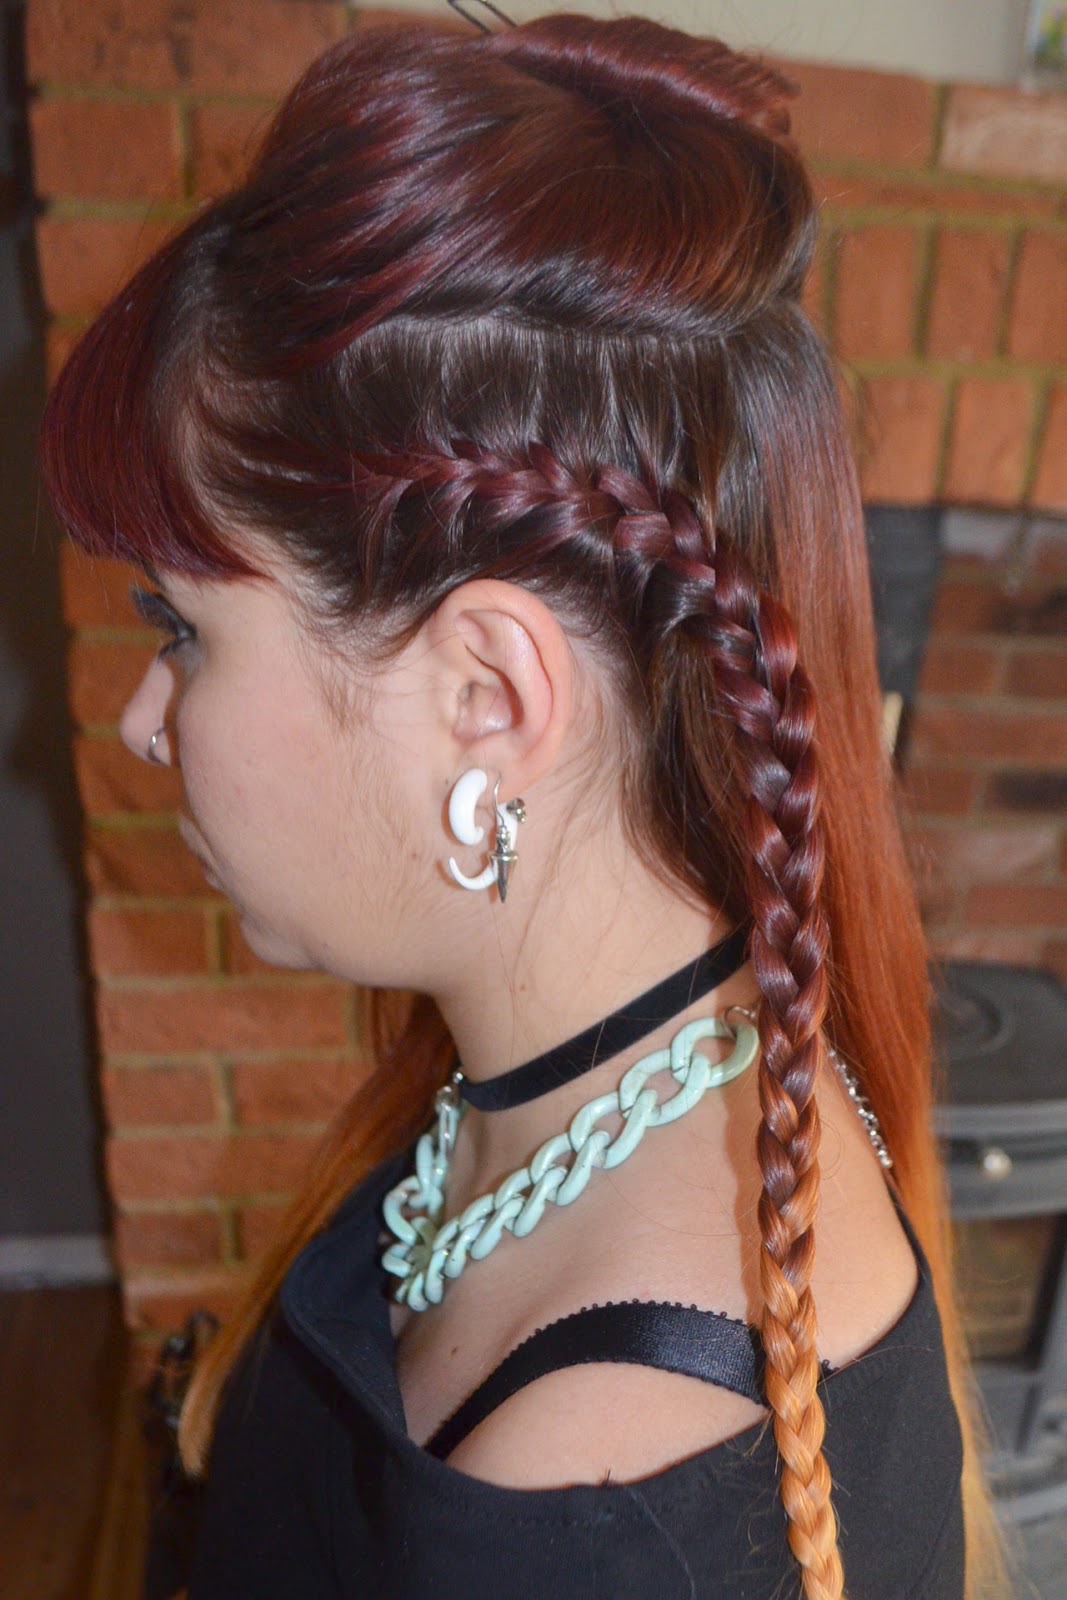
Now that I’ve got this fiery ombre look, Nat and I decided to have a little play around with some up-dos (in my living room, so excuse the mess, we're not tidy workers). Also, the lovely people at Label.M sent me their Texturising Volume Spray to try out, so all of these styles show the best way to use this product when doing hair ups.
                              

Look 1


1)Take the top section of hair, starting two inches above the ear and clip it up.

       2) French plait the remaining hair above the ears on both side until you’ve reached just behind the ear, then    continue plaiting the lengths. Secure at the ends with a pin.

      3) Unclip the top section, add Label M spray, remembering to hold the spray about 20cm away from the hair, and then backcomb. Bring together, push forward for height, twist and pin securely.
                                                     
4)Take the remaining hair at the back, twist up into a rough chignon and pin.


    5)Bring the remaining hair around into a rough bun, and pin.
    6) Take the plaits and wrap the loose ends around the bun


.


Look 2

        1)Follow steps 1,2 and 3 from above, but put the remaining hair into a secure ponytail.
       2)Wrap the plaits around, in opposite directions around the ponytail.


        3)Add some Label.M Texturising Volume Spray  to the ponytail for a messy texture.

Look 3

       1) Brush hair to one side
       2)Spray Label.M Texturisng Volume Spray to top part of the hair. Ruffle with fingers for a messy texture.
        3)Spray the rest of the hair with Label.M Texturising Volume Spray if you’re hair is really smooth or difficult to manipulate.  
        4)Divide hair into two sections.
        5)Take a small piece from the outside of the left section, and pass over the front  to the right section. Take a small piece from the outside of the right section, and pass over the front to the left section.
       6)  Leave out every third strand for a tassel look.


Look 4

       1)  Repeat all of the above steps except the last.
       2)Instead of leaving pieces out, incorporate all of the hair into a fishtail plat, and pull out the strands once tied to loosen it and spray well with Label.M Texturising Volume Spray. 

   Me and Nat really enjoyed working with the Label.M Texturising Volume Spray. I have really thick, sleek hair that'll slip out of any style I put it in. The spray added enough texture to make it workable and enabled us to manipulate it in a variety of ways. However be really vigilant as to how close to the hair you hold the spray. Just like dry shampoo, if you hold it too close, you will end up with grey patches. On that note, is does actually work quite well as a dry shampoo or a hairspray, and can add a bit of edge to normal straight hair. 
    I hope you find these tutorials useful, and if you're from the Bedfordshire area and want more information on Nat's work, visit elegancebytlc.co.uk

Steph and Nat 
x x x


READ MORE

Thursday, 24 April 2014

Meat Liquor

Happy Thursday people!!
Now this post is going to be a little bit different. 
Two of my other big passions are food and books. In fact I'd go as far as saying they're my obsessions. 
I would love at some point for this blog to be more lifestyle focused, with restaurant/foodie posts and literature reviews/rants (if a plot twist really irks me) among my fashion and beauty posts. So two weeks ago I went to a restaurant that I've been wanting to go to for months, and you've probably heard about it by now. I loved it so much, that I thought I'd make it my first lifestyle food post. If it goes down well, then I'll create a separate page for this kind of thing! 


The hype over Meat Liquor has grown a lot in recent months. I heard about it almost a year ago, but since then I've seen so many pictures on Facebook and Instagram of my friend's Man vs Food sized trays of greasy delights that when two weeks ago, me, my boyfriend and my friends from uni decided to have a little reunion in London, I suggested we make Meat Liquor our watering hole for the evening. 

  
Arriving a bit early, me and my boyfriend were sure we were on the wrong street. I'd created in my head an image of a slightly garish, stereotypical American diner with neon signs, but a venue of such was nowhere to be found. Instead, the first floor of a very unassuming and reserved concrete car park that we had walked past without a second of acknowledgement happened to be what we were looking for. 


The closer we got, the more we noticed the queue of people before had looked like a group of London office workers taking a fag break. Upon meeting up with another friend, we found out that the restaurant wouldn't let us in to be seated until the entire group was present. This basically helps them reduce waiting times, so we chilled at a nearby pub for a bit.


Once our entire group had arrived, a man at the door took the name of a member of the group, and how many of us there were, and told us to wait at the bar. The first thing that will take you by surprise upon entering Meat Liquor is how dark it is (hense the reddish tinge to all my photos. Flash wasn’t too flattering either), and from reading other reviews, for some people it is a major down point. For me, I love the dark. No matter how sunny it is outside I’ll never open my curtains, so I felt right at home. It’s not pitch black, but the lighting is very dim, and has a reddish tinge that adds to the grungy slaughterhouse-esque decor (look out for the blood stained plastic curtain).


Waiting at the bar, we scoured the Liquor menu, which consists of some scrumptious concoctions. I had the Louisiana Jam, which is Southern Comfort, apricot jam, lemon juice and mint. These are the dangerous kinds of cocktails where you can’t taste the alcohol and you’re half-cut before you’ve even been seated. For central London, Meat Liquor’s cocktails are reasonably priced, with the majority at £7.50, however they do vary in size.


 Once we’d been seated, everyone started looking at the menu, but having known about this place for ages and drooled over pictures of their food, I already knew what I was having. I’d heard Adam from Man vs Food (I’m sure you’ve realised by now I’m obsessed with this show) go on and on about Philli Cheese Steak, so when I saw that Meat Liquor did a Philli Cheese Steak sandwhich, I was sold. Me and the boyfriend also shared a side of cheesy fries. Whilst everyone else spent ages choosing their mix of cheese drenched mains and sides, I sat back and took in the awesome atmosphere, with the sound of American vintage rock music drowning out the buzzing, lively conversations between friends trying sips and forkfuls of each other’s meat and liquor.


As filling as the meal was, I couldn’t get enough. I’ve had cheesy fries before, but nothing was on par with these ones. The chips were so crispy with just the right amount of salt, and the cheese was ridiculously stringy. As for the sandwich, it was the texture more than anything that made me fall in love. It was so soft and gooey and succulent that every time I sank my teeth into it, I just wanted to leave them there.  My favourite thing about it was the pool of soft cheese that ran all the way through the bottom of the hot dog bun. This is definitely not the place for calorie counters.


You’d think that after all that food, there’s no way we had room for dessert. But when we saw the chocolate and peanut butter sundae on the menu, we thought it would only be right. So we got two and shared it between five of us. Honestly, it wasn’t anything amazing, just a typical sundae, but it tasted so good after all the salt, meat and cheese we’d consumed. But it’s definitely the mains you should go there for, not the desserts. 

I'd love to hear what you guys think about this post. I would really like to expand the blog to feature more lifestyle posts, so some feedback would really be appreciated. 

Steph x x x

*All photos taken by myself and Chloe Alexander


READ MORE

Tuesday, 22 April 2014

Hello Cheeky

Afternoon all!!!
Did you have a good Easter? How many Easter Eggs have you managed to devour? (I'm currently on my fourth, but that doesn't include all the cream eggs) 

Now before I have a chocolate induced spot outbreak, I'm currently enjoying trying out a sample of the Cheek Pop that the lovely people at Clinique sent me. 


LOOK HOW CUTE IT IS. I love the packaging, so much so that even though it's slowly decaying in my make-up bag, I still insist on keeping it. And the daisy pattern that the blush is set in makes me feel summery every time I open it, even though with each use it's slowly fading away, which makes me sad (so many feels). 

I'm really loving some of the summer shades for make-up that are out at the moment, and the Cheek Pop is such a perfect addition to your summer make-up collection. 
Now this blush is only available in four shades, which has received mixed opinions looking at customer reviews, but I really like the small selection. 

The four available shades are:

The first two are the two warmest shades, whilst the Berry and Plum Pops have a bluer, cooler hue. Each of these shades are vibrant yet natural in tone, and despite the small selection, there is a shade for every skin tone. All you have to do is break down the shades into a scale of dark warm-light warm- dark cool - light cool. Then you just need to figure out if you have a dark or cool skin tone and whether you prefer a dark or light blush. I feel when there are so many shades to choose from, that's when things start to get confusing. For me, I have quite an olive skin tone, and I usually wear quite warm, bronze coloured blushes, but I decided to step out of my comfort zone and go for a warm light blush: the Peach Pop. 

I am so happy with this choice. I was honestly worried it would be too light for me, but it works so well, and actually brightens up my face. For a casual day look, I go for the hue on the far left on the swatch above. It's so subtle, but there's just enough colour present to highlight your cheeks. For an evening look, if I want my eyes to be the statement area then I'll opt for the hue in the middle, however if my eyes are quite bare, then I'll brighten up the blush. 

What I really love about this blush is that even though it's technically a compact powder blush, it's really buttery and soft to the touch, and  applies and sits on the skin like a cream blush. This creamy texture means that it can be applied and blended into the skin very easily with the fingers, which I actually prefer with this particular blush over using a brush. 

Have you tried this product yet? If you have I'd love to hear your thoughts. Also I' love to hear your thoughts on this post. I definitely want to do more like it, and I was wondering whether to put up a picture of me wearing the blush, but thought the swatch showed it better. Let me know what you think, any feedback is welcome : D 

Steph
x x x 


READ MORE

Tuesday, 15 April 2014

Textured Nails

Nail varnish. 
Oh how I love it. Oh how I'm addicted to it. 
I am a self-confessed nail varnish hoarder, and this post is basically about how that hoard has just grown by two. 
Words cannot explain how much I love the fact that the world of nail art has expanded into so many forms, whether it's nail wraps, art pens, confetti, sequins, magnets, or crocodile effects. 

I used to bite my nails quite badly (sometimes if i'm stressed or nervous or bored I still do), but I must say the wide range of options available when it comes to nail art has become my motivation to stop. 

So these two nail varnishes were quite a spontaneous purchase, but these two textured effects I hadn't yet tried, so to a nail varnish hoarder, this purchase was a must. 


The Barry M Matte Nail Paint is the first matte nail varnish I've tried, and I was really impressed. I was a bit disappointed with the range of colours in this collections, which consisted of just this Burgundy shade, a Black, a Light Brown Caramel, a Nude Vanilla and a Brown Mocha. Granted, all of these shades would look amazing in matte effect,but I think this is an effect that I personally think if it was on every Barry M shade, I'd happily buy the entire lot with my life savings. 

It applies really evenly, and two coats is enough for an opaque, matte finish. I think for a grungey look, this particular shade is a nice, more Summery alternative to black. 
One thing that I was really surprised with was how long it was before the varnish chipped. I really love Barry M as a brand, simply for it's variety of shades and effects, but I do have a few issues with how quickly the varnishes chip, but this particular shade was quite resilient, and that was without a top coat, which would obviously take away the matte effect. 


As for Seventeen, I've never used their products before, but was attracted to their Rock Hard Nail Effects collection. Said to give your nails a gritty concrete effect, I was really curious as to how this would look. 
I really like the grey colour, and again it applied really evenly, and two coats is more than enough for an even finish. This is an effect that I think can only be noticed up close, but it does look good. The varnish is supposed to be matte as well, but the matte effect is nowhere near as noticeable as the Barry M varnish. 
This varnish also comes in a red, a black and a blue. 

Steph x x x


READ MORE

Thursday, 10 April 2014

New Hair - Dip Dye How-To

So I mentioned in my last post that I'd had a complete hair makeover, which was my reason for buying the Remington Pearl Pro Curl. If you've read my About Me page, you'll also remember my mentioning of my lovely friend and hairdressing genius Natalie. Now we met back in 2008, working at a local hair salon together. To this day, she is one of my closest friends, and one of the most talented hairdressers I've ever met. She has been doing my hair for years now, and I don't think I'd trust any one else with it.

So when I decided I wanted a bit of a change, I thought it would be a perfect opportunity to introduce you to her, and show you an example of some of the posts we'll be doing together in the future. So without further ado, here is Nat:


 and here is my snazzy new do, literally minutes after it was done.:


Ta-da!!!!

I've been a redhead for almost four years now and with all these amazing pastel shades popping up, I was envious of the new lease of life everyone's hair seemed to be getting. Now I've never bleached my hair all over before, and as much as I want a pastel shade, I'm not ready to commit to bleaching my hair all over, simply because of how much colour i'd have to strip off, and I'll admit it now, I'm not very good at regular trims and overall hair maintenance, so I wasn't sure my hair could take it.

Instead, I opted for a firey dip-dye, to test the bleachy water, and I couldn't be happier. I almost squealed the other day when someone told me it looked like my hair was on fire. Now there's no way I would have attempted this by myself, but I am a massive scaredy cat when it comes to my hair. I'm extremely over-protective of it. But if you do decide to do something like this yourself, I've provided below a step-by-step how-to of everything Natalie did to get this look, as well as some tips and advice.

What you'll need
Sectioning clips | Mixing Bowl | Tinting Brush | An old towel/hairdressing cloak | Peroxide  and Bleach Powder (see image below for reference | Tin Foil | Gloves


Method
1) In a tint bowl, mix peroxide (We used volume 40 to get through all the layers of red dye) and bleach powder half and half, until both components are combined.
2) Section hair into 4 pieces: two at the front, two at the back like so.

 3)Wearing gloves and using the tint brush, apply bleach to one of the front sections, applying a very thick amount to the ends. Using your hands, WITH GLOVES ON, massage the bleach into the ends to make sure it covers all the hairs, and then spread the bleach upwards to the mid-lengths, or the point where you want the dip-dye to start. There should be a lot more bleach on the ends than towards the top. The decrease in bleach the higher you go ensures the gradient effect. Repeat this on the other three sections.  Leave for 45 minutes.
4)For faster results, wrap  the bleached sections  in tin foil. 
5)Rinse off with shampoo and dry.
6)Reapply a fresh mixture of bleach (same measurements) to the very ends to slightly lighten them, about an inch or so up. Leave for about 15 minutes and again wrap in tin foil.
7)Rinse, condition and style.
   - For any sort of dip-dye, I feel the best way to showcase the gradient is to curl the hair, like the pictures         below,  hence why I purchased the Remington Pearl Pro Curl


As I mentioned in my March Haul post, I did a lot of research before buying this product, because I've never used one before, and I don't want to do any damage to my hair. So for my first try, just to be safe, Nat showed me the best way to use them, as well as some extra advice and tips on how to make the curls last, which we're going to share with you too. 

Curls

1) Section into four pieces, like you did for the dip-dye : two at the front, two at the back
2) On a section of your choice, take a thin slice of hair from the very bottom. Clip the rest of the section              away.
3) There are two ways to curl your hair, depending on what style curl you want. Putting the wand on top of the hair with hair going under it creates a curl with more of flick out, however this doesn't create volume.
Putting the wand under the hair with the hair going over it creates volume and lift, especially at the top of the head.  Pick one of these techniques, and use it on the first thin slice of hair. Repeat this all the way to the top of your first section. Then repeat for the remaining three sections.
TOP TIP: If like me you have thick hair, which is prone to dropping, spray each slice of hair with hair spray before you curl it, and spray it once more just after. (I recommend Tresemme Salon Finish Extra Hold )
Also, thick hair is quite heavy, which makes it quite hard to create volume. For a helping hand, use a texturing or volume spray. We used Label M's Texturising Volume Spray.
4) Give all your hair a quick once over with the hair spray again if you find your curls are dropping.  Tip your hair upside down and give a light spray with the texturising spray if needed.
5) Can neaten curls with a flat bristle brush. This type won't brush out the curls.

So here is the finished look : D Just for reference, as a base I use Loreal Feria Pure Scarlet Power.
It's taking me a while to get used to the full fringe, but I'm so in love with the dip-dye. I can't thank Natalie enough.


If there's anyone out there from the Bedfordshire area who's interested in contacting Natalie about having your hair done, or some of her work, contact Elegance Salon by TLC, Brickhill, Bedford, or check out their website at www.elegancebytlc.co.uk


READ MORE

Friday, 4 April 2014

March Haul

Hello all : )
So another month down, and one more month closer to Summer. 
Now through March, with the odd day of incredible summer-style weather, I caught the shopping bug that means the majority of what I bought was only really suitable for those odd, yet glorious days, however, I remain hopeful that there will be a lot more of them. 
Unfortunately, due to the smoggy pollution situation, right now the sky in Bedfordshire is a grim grey, so in an attempt to bring back that carefree summer feeling, I decided to share with you my March purchases. 
I admit that for the beginning of my new Summer wardrobe, color is a bit sparse, however whenever Winter comes around, I get stuck in a monochrome phase (with the odd splash of green, my favorite color) so this is my wardrobes slow transformation into a colorful butterfly. 

Top Right to Bottom Right (clothes) 

- H&M Ain't No Pug T-Shirt 


From Top to Bottom: 
-River Island Monochrome Cherub T-Shirt (bought in store, cannot find online, but will keep looking)


Top to Bottom:


Left to Right: 


I'm so happy with this haul, especially the curling wand. I've recently drastically changed my hair (all to be revealed, however if you follow me on Instagram @STEPHANIESOFOKLEOUS you'll get a preview) and really wanted to see what it looked like curled. It took me forever to actually find a curling wand that had good reviews, but I finally stumbled across this one on Amazon. Not a bad review insight, and only £22, I just had to get it. 

I guess this is more of a capsule start to my Summer wardrobe; a collection of things that I can mix and match, and are just really handy to have. The two t-shirts look really good with the jeans, or with a faux leather pencil skirt, whilst the bardot top adds a more formal look to the jeans, and contrasts really well with the bright yellow shorts, which are so cute, and I can't wait to style them. 
The rings I have already mentioned in previous post, but I am still so in love with them, and I think they work so well with everything I bought this month. 

In regards to the nail varnishes, they're not the summeriest of colors I know, but I've needed a black nail varnish for ages, an I will always go back to Barry M for my classic colors. I also love texture nail varnishes, so really wanted to try out one of Barry M's Matte Collection, and whilst I was looking around in Boots, I found Seventeen, and their Rock Hard collection, which I decided to give a go as well. I do plan on doing a post purely for these varnishes, so stay tuned for that. 

I will be doing posts styling all of these items, and as well as product reviews, and a reveal of my new hair. Eeeek. 

So what have you guys been splashing your money on?
Also, I'm getting used to using curling wands, so if you guys have any advice on using them and heat protection, I'd really appreciate it. 

Steph
x x x


READ MORE